

Hp Pavilion Change Hdd To Ssd
Z7_3054ICK0KGTE30AQO5O3KA30N0
Removing and Replacing the Difficult Disk Drive for HP Pavilion x360 Notebook PCs
This certificate applies to HP Pavilion x360 notebook computers.

Before you begin
-
You demand a Phillips head screwdriver.
-
Turn off the computer. Disconnect the Ethernet or modem cable. Disconnect the ability cord.
-
Transfer the reckoner to a clear, flat, stable work surface over a not-carpeted floor.
-
HP strongly recommends the apply of an anti-static wrist strap and a conductive cream pad when working on the computer.
-
Practice not remove a component from its protective packaging until you lot are ready to install information technology.
alert:The edges of metal panels can cutting skin. Be conscientious not to slide peel along any interior metallic edge of the computer.
alarm:Before starting, power off the computer and wait for components to cool before starting these procedures.
caution:This product contains components that tin can be damaged by electrostatic discharge (ESD). To reduce the hazard of ESD damage, work over a non-carpeted floor, utilize a static dissipative piece of work surface (such as a conductive foam pad), and wear an ESD wrist strap connected to a grounded surface.
caution:Procedures in this certificate are provided by HP for qualified service agents and as a courtesy to its customers. Servicing internal components increases the run a risk of dissentious the computer which might not be covered under warranty. Understand the take chances and refer to the production's warranty earlier attempting to service the computer.
Video overview
View the post-obit video before using the steps in this commodity.

note:The video and graphics in this article depict a specific configuration of notebook reckoner. These same removal and replacement procedures apply to all configurations for all HP Pavilion x360 Notebook computers.
Removing the difficult deejay bulldoze
warning:Make sure the figurer is disconnected from power before starting.
Follow the steps in this department to remove the hard disk bulldoze.
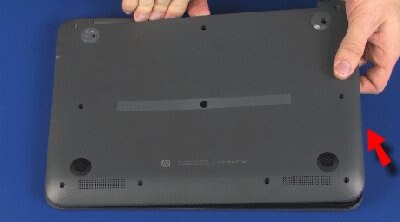
| Footstep i Remove the base enclosure. For instructions to remove the base of operations enclosure, see the HP support document, Removing and Replacing the Base Enclosure. | |
| Step two Find the bombardment cablevision. | |
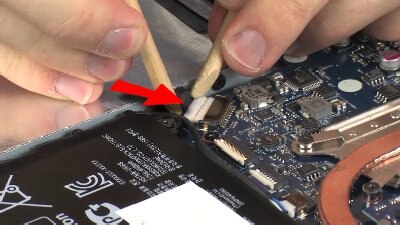
| Stride 3 Disconnect the battery cablevision from its connector on the organization board. | |
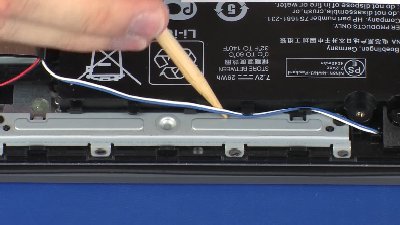
| Step 4 Disconnect the speaker cable from the connector on the organisation board. | |
| Pace five Remove the speaker cable from the routing tabs on the battery. Be sure to notice the routing of the speaker cablevision for after replacement. | |
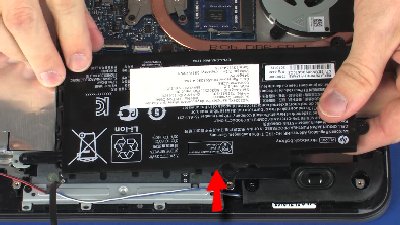
| Step 6 Remove the four screws that secure the battery to the pinnacle embrace. | |
| Pace vii Elevator the bombardment off of the standoffs on the top encompass. | |
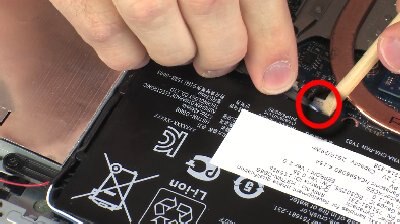
| Step viii Pare back the retention tape. | |
| Step ix Remove the hard disk drive adapter cable, noting its location for replacement. | |
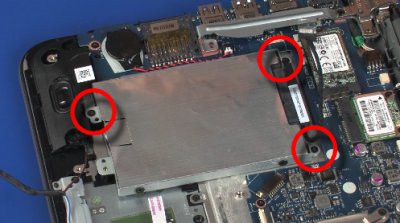
| Pace 10 Remove the iii screws that secure the hard disk drive associates to the acme cover. | |
| Step eleven Remove the hard disk drive assembly, and place it in a static dissipative bag. | |


Replacing the hard disk drive
Apply the steps in this section to replace the hard disk drive drive.
| Pace 1 Replace the hard disk drive assembly by placing it on the standoffs on the top embrace. | |
| Step two Supplant the iii screws that secure the hard disk bulldoze associates to the peak comprehend. | |
| Footstep 3 Supercede the hd adapter cable. | |
| Stride 4 Replace the retention tape by pressing downward. | |
| Step 5 Road the adapter cable through the routing channel next to the hard drive disk assembly. | |
| Stride 6 Identify the battery onto the standoffs | |
| Footstep 7 Supercede the iv screws that secure the battery to the top encompass. | |
| Step 8 Route the speaker cable through the routing tabs on the battery. | |
| Step ix Connect the speaker cable into its connector on the system board. | |
| Step x Connect the battery cable into its connector on the system board. | |
| Step 11 Replace the base enclosure. For instructions to supervene upon the base enclosure, see the HP support document, Removing and Replacing the Base Enclosure. | |


Source: https://support.hp.com/id-en/document/c04179264
Posted by: greenyourt1936.blogspot.com
0 Response to "Hp Pavilion Change Hdd To Ssd"
Post a Comment